Sending LAO your refugee and immigration documents
Effective November 2016, refugee and Immigration panel lawyers will be able to attach requests for authorizations, merit assessments, and other documents related to refugee and immigration certificates via Legal Aid Online, including:
- Judicial Review (JR) merit assessment materials
- Merit assessments and any other supporting documents
- Orders granting leave
- Requests for JR hearing coverage
- Refugee Appeal Division (RAD) merit assessment materials
- Merit assessments
- Any other supporting documents
- Signed/Dated BOC and Narrative
- Refugee Protection Division (RPD) authorization materials
- Requests for RPD hearing authorization
- Requests for subsequent hearing authorizations
- Requests for written submissions authorizations
- RPD backdate requests
- Legacy case extension requests
- Materials for other immigration authorizations (any documents pertaining to any other immigration certificate, for example:
- H&C applications
- Pre-removal risk assessments
- Detention reviews
- IAD deportation/sponsorship appeals
- Vacation/cessation hearings
- Deferrals of removal, stay motions, etc.
To attach and submit electronic documents to Legal Aid Ontario, please follow this step by step process:
- After you’ve logged in to the Legal Aid Online home page, click on the Certificate tab.
 Click here to download image.
Figure 1. Certificate tab - On the new page, click on the “Certificate amendment/ authorization” link
 Click here to download image.
Figure 2.Certificate amendment/authorization link - On the Certifcate Look Up Page, select the certicate number to which you want to attach documents.
 Click here to download image.
Figure 3. Certificate Look Up Page - On the Certificate information page. Click on the new Documents Attachments link to take you to the certificate document attachment page.
 Click here to download image.
Figure 4. Document Attachments link - Once on the Certificate Documents attachment page, complete five steps, as follows:
 Click here to download image.
Figure 5. Document Attachement Page - Step 1. Fill in the Description field. Enter a short description of the document attached e.g. “merit assessment.”
- Step 2. Click on the look up tool to select the document type e.g. ID code 100- JR Materials (see Figure 6).To attach multiple documents click on the Add New button (highlighted in Figure 5). NOTE: You will get an error message if you try to submit a document prior to adding it.
 Click here to download image.
Figure 6. Document ID look-up - Step 3: Attach the document: Click the Browse button and select the document you want to attach (see Figure 7).
 Click here to download image.
Figure 7. Browse button - Removing a document attachment: To remove a document attachment, click on the delete tab in the same row as the Add new in Figure 5
- Once the document has been selected, click Upload. (see Figure 8)
 Click here to download image.
Figure 8. Upload button - Step 4: Enter any additional comments (see Figure 9). This is not a mandatory field. 1000 characters are available for any additional comments.
 Click here to download image.
Figure 9. Comments field - Step 5. Click on the “Submit Tab”Once you have selected “Submit,” you will receive the following pop-up message to tell you that you have successfully submitted your document(s). (See Figure 10).
”") Click here to download image.
Click here to download image.Figure 10. Successfully submitted message box
Once the document has been successfully submitted, the “Historical Attachment” section will display all the relevant details (see Figure 11). The Attachment and Comments remain available for viewing and/or printing.
 Click here to download image.
Figure 11. View historical attachments
Requirements for submitting completed Basis of Claim forms and billing for the preparation and filing
LAO requires roster members to submit completed (signed and dated) Basis of Claim (BOC) forms and narratives to LAO within 30 days of completing the BOC.
This requirement applies to all BOC certificates, whether an RPD hearing authorization is or will be requested.
BOC form and Narrative Submission – Document Code 115
Within 30 days of completing the BOC form and narrative, they must be uploaded to Legal Aid Online.
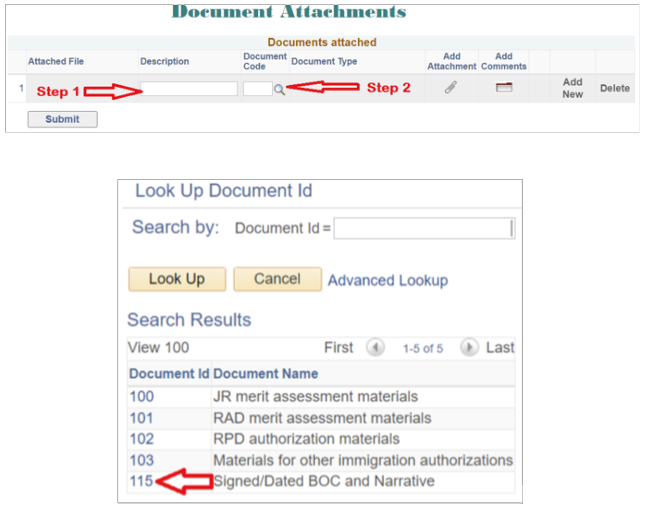
- Step 1: In the Document Attachments section for the BOC certificate, under “Description” indicate “completed BOC.”
- Step 2: Under “Document Code” select “115 Signed/Dated BOC and Narrative.”
Important: Please note that submitting a BOC and narrative alone will not generate a request for RPD Hearing authorization. If your client also requires RPD hearing coverage, you must also follow the instructions under RPD Hearing Authorization Requests.
 Click here to download image.